|
|
Series - Stitches and Threads: A Bonnet |
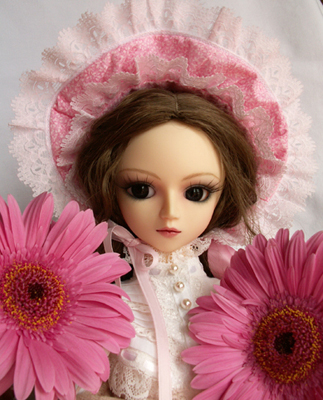 Download the bonnet pattern for this tutorial :
Dollicieux
Bonnet Pattern.
Before getting into the tutorial I must thank Chris for this wonderful pattern. I mentioned that we needed some new tutorials for Dollicieux on the phone one night and she volunteered to draft some patterns. We appreciate it so much. Sewing is very new to me so when the pattern arrived via email I decided to try it myself. Chris did not send instructions as she was leaving for Japan the next morning but I thought I would be able to figure things out on my own. After a few mistakes the project came together. I hope you enjoy making your own bonnet. Chris has promised us to make more patterns for Dollicieux if there is interest.
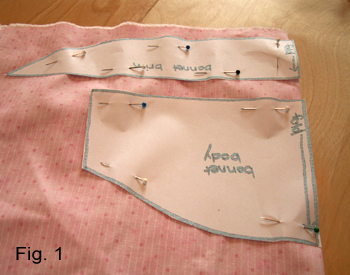 Download the pattern and print it off. Make sure to measure the line guide on
the pattern so you are sure the pattern printed at the correct size. All seams
are 1/8 inch. Pick out your fabric, lace and ribbon. I chose to add lace to the
brim of the bonnet but it isn't necessary. If you do want lace on the brim then
it is best to buy gathered lace if you want the same effect I got. Flat lace
will not make a ruffle (although it would look just as nice). You should always
pre-wash your fabric but it is very important if you are choosing a dark fabric
as the dark dye may stain your doll. After pre-washing the fabric iron all the
wrinkles out.
 Cut
your pattern out and pin it to the fabric (Fig. 1). Remember to pin the pattern
on a fold to get the full piece you need. Be sure to cut two sets of the
pattern, one for the outside of the bonnet and one set for the lining. Sew your
ruffled lace to the inside/liner pieces of the bonnet (Fig. 2). You should sew
the lace to the straight edge of the bonnet brim and a piece of lace to the
round side of the brim (as in picture). If you want lace on the outside of the
bonnet now is the time to sew that on as well.
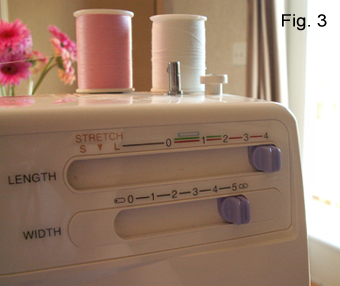 Next you need to gather the fabric. Gathering the fabric is easiest if you set
your sewing machine to the full length (4) and width (5) as seen in Fig. 3. Do
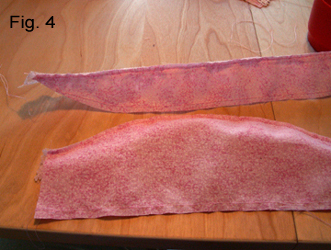
not backstitch. Just sew a straight line down the curved edge of the brim and
the straight side of the bonnet body (as seen in Fig. 4). Now take one of the
loose treads and start to pull it. The fabric should start to gather.
 Push
the gathers along the fabric until you have a consistent gather across the
entire piece of fabric. Pin the corners to of the gathered side of the brim to
the curved side of the bonnet (Fig. 5). Smooth out the gathers until they are
even across the brim and finish pinning the two pieces together. Sew them
together (do not forget to return your machine settings to their original length
and width). Do this for both the outside and the lining. The lining can be a bit
tricky because of all the lace, just go slowly and continue checking that you
are not sewing the lace.
 Once you have both brims sewn to their body pieces (Fig. 6) you should begin to
gather the back of the bonnet body in the same fashion as you did with the brim.
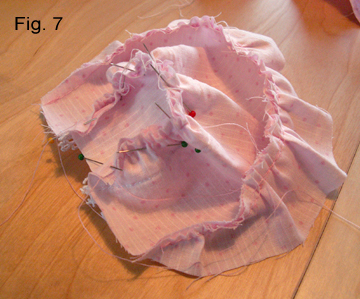
Again even the gathers out to fit to the bonnet back (Fig. 7) This is the most
difficult part of the sewing process in my opinion and I had to do it twice as I
kept sewing off the bonnet back. Just take your time and turn the fabric slowly.
 After you have sewn the bonnet back to the bonnet body for both the lining and
the outside it is time to sew the two pieces together. Make sure you put the
wrong sides together when you pin them together (the nice side of the fabric
should be on the inside). If you have sewn lace to the lining of your bonnet
brim be sure to tuck in inside so when you turn the bonnet inside out once you
are done all the lace will be on the correct side of the bonnet. Make sure you
leave the bottom of the bonnet open so that you can turn it right side out.
 Once the brims have been sewn together turn the bonnet inside out so that the
nice side of the fabric is outside (Fig. 8) You have to turn the fabric in at
the bottom and sew on the nice side of the fabric now to finish the bonnet off.
 You
may want to sew the chin ribbon in at this point (I did not do this in my
tutorial but the next one I make I will sew that chin ribbon in at this step).
If are going to sew the chin ribbon in between the two layers just pin it at the
spot the brim joins the body, making sure it is in between the two layers. If
you choose not to sew the chin ribbon in while closing the bottom of the bonnet,
you will have to sew it on the outside as I did. Finally tie two pretty bows (or
buy some) and sew them to the corners of the bonnet over the spot the chin
ribbon joins the bonnet.
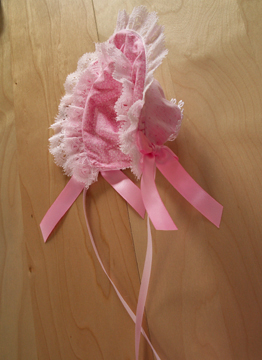
This bonnet can be modified just by changing the lace and ribbons you choose to use. It is a wonderful pattern and we hope you enjoy making one as much as I did. Thanks again to Chris for making this pretty little project for us. Next month she has promised another. The intention is to have an entire outfit for your 60cm girl within a few issues.
Happy Sewing!!
| May 2006 - vol. 1 issue 9 | Back to Table of Contents |